
Creating clouds in a cake is one of the most enchanting cake-decorating techniques. These fluffy, dream-like designs can transform any ordinary cake into a whimsical masterpiece, perfect for birthdays, baby showers, weddings, or simply when you’re in the mood for something fun. Whether you’re a beginner or a seasoned baker, this guide will walk you through the essential tools, ingredients, and techniques for achieving those cloud-like cake decorations. By the end, you’ll be equipped with the know-how to craft a cake that’s as stunning as it is delicious. So, roll up your sleeves, and let’s bring the skies to your kitchen!
Understanding Cloud Cakes
What Are Cloud Cakes?
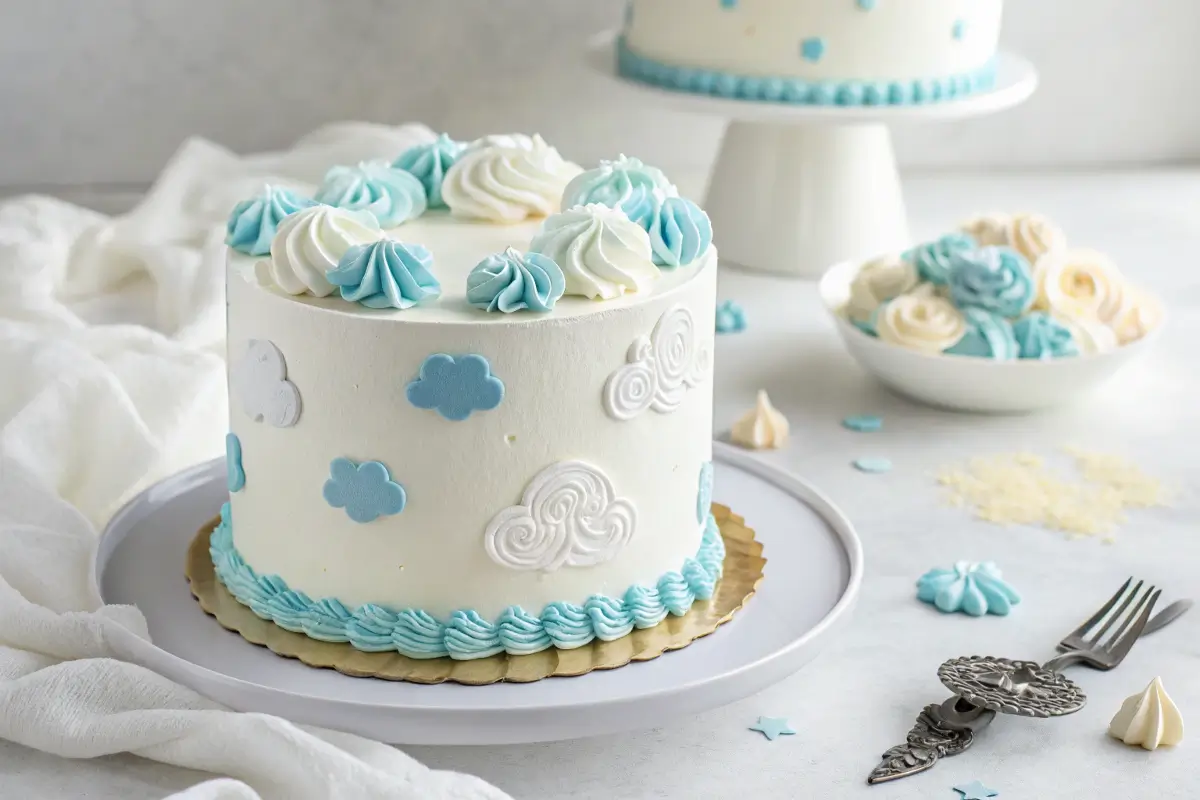
Cloud cakes are a style of cake decoration that mimics the fluffy, airy appearance of clouds. Using techniques like piping, stenciling, or airbrushing, bakers recreate the soft, dreamy aesthetic of clouds directly on the cake’s surface. These designs are not only visually appealing but also evoke a sense of whimsy and wonder. Perfect for all ages, cloud cakes have become a favorite for themed parties and artistic dessert creations.
Origins of Cloud Cake Decorations
The trend of cloud cakes gained traction with the rise of Instagram-worthy desserts and modern baking shows. Inspired by nature and fantasy, bakers began experimenting with textures, colors, and edible glitter to create skies, sunsets, and even 3D cloud effects. Today, the cloud cake trend continues to evolve, blending traditional and modern decorating methods.
Popular Occasions to Use Cloud Cakes
Cloud cakes are ideal for a variety of celebrations. For instance:
- Baby showers: Add blue or pink clouds for a gender reveal cake.
- Weddings: Incorporate elegant white clouds for a celestial theme.
- Children’s parties: Pair clouds with rainbows or cartoon characters for a playful vibe.
- Seasonal events: Use pastel hues for spring or vibrant colors for summer festivities.
With the endless possibilities, it’s no wonder cloud cakes are a go-to choice for artistic bakers. Whether you’re making a fluffy frosting masterpiece or airbrushed clouds, the charm of these cakes is timeless.
Essential Ingredients and Tools
Key Ingredients for Creating Cloud Effects
To achieve realistic cloud-like effects on your cake, you need the right ingredients. The foundation is a perfectly baked cake, but the magic truly lies in the frosting and decorating materials:
- Buttercream frosting: Ideal for creating fluffy, smooth clouds.
- Whipped cream: Light and airy, perfect for mimicking real clouds.
- Gel food coloring: Use subtle shades like white, blue, and gray for a dreamy effect.
- Edible glitter or luster dust: Adds a touch of sparkle to your cloud design.
- Fondant or marshmallow mix (optional): For structured, 3D cloud accents.
These ingredients work in harmony to bring your cloud cake to life. If you’re unsure about your frosting base, check out this guide to cloud cakes for inspiration.
Must-Have Tools for Cake Decorating
Your tools matter just as much as your ingredients. Here’s what you’ll need:
- Piping bags and nozzles: Use round or petal tips for soft cloud shapes.
- Offset spatula: Smooths frosting layers effortlessly.
- Airbrush machine: Creates gradient effects, adding depth to your clouds.
- Stencils: Helps to outline precise cloud shapes.
- Turntable: Makes decorating easier and ensures symmetry.
Having the right tools ensures that every detail is perfect when learning how to make clouds in a cake.
Choosing the Right Food Colors for Clouds
The color palette can make or break the dreamy aesthetic. Always choose soft pastel shades or stick to pure white for a classic cloud design. Avoid overusing dark hues as they may overpower the delicate cloud look. Experiment with blues and grays for a realistic touch, blending them seamlessly into the frosting.
Techniques to Create Cloud Effects
The Traditional Buttercream Cloud Technique
Buttercream is the go-to choice for many bakers. Start by frosting the cake with a base layer, then use a piping bag with a round nozzle to create cloud shapes. Smooth or fluff the edges with an offset spatula to make the clouds appear natural.
Using Whipped Cream for a Fluffy Cloud Texture
If you’re aiming for ultra-light, fluffy clouds, whipped cream is the way to go. However, it’s important to stabilize the whipped cream with gelatin or a stabilizing agent. This ensures your clouds maintain their shape and texture for hours, even in warm settings.
Airbrushing Clouds for a Professional Look
For bakers who want an elegant finish, airbrushing is a game-changer. Use an airbrush machine to spray soft gradients of blue and white across your cake. This technique creates depth and shadows, giving the illusion of clouds floating in a sky.
Stencil Methods for Easy Cloud Shapes
Stencils are perfect for beginners. Simply place a stencil on your frosted cake and sprinkle edible glitter or powdered sugar over it. Lift the stencil carefully, and voilà—you have a precise cloud outline.
Mastering these techniques will make learning how to make clouds in a cake a breeze. Combine methods like airbrushing and buttercream piping to create a layered, textured look that’s bound to impress.
Step-by-Step Cloud Cake Tutorial
Preparing the Base Cake
The foundation of any stunning cloud cake is a well-baked base. Start with your favorite sponge cake recipe, ensuring it’s light and fluffy. Vanilla, chiffon, or even lemon cake works beautifully for this design. Once baked, let the layers cool completely. Pro tip: Chill the cake in the fridge for 30 minutes before decorating to prevent the frosting from melting.
Mixing the Perfect Cloud-Like Frosting
The frosting is where the magic happens. Whip up a batch of buttercream frosting or stabilized whipped cream. Divide the frosting into separate bowls if you plan to use multiple shades. Use gel food coloring to achieve soft hues like white, pale blue, or light gray. Remember, a little goes a long way—start with a small drop and mix well.
Applying the Cloud Design with Piping Bags
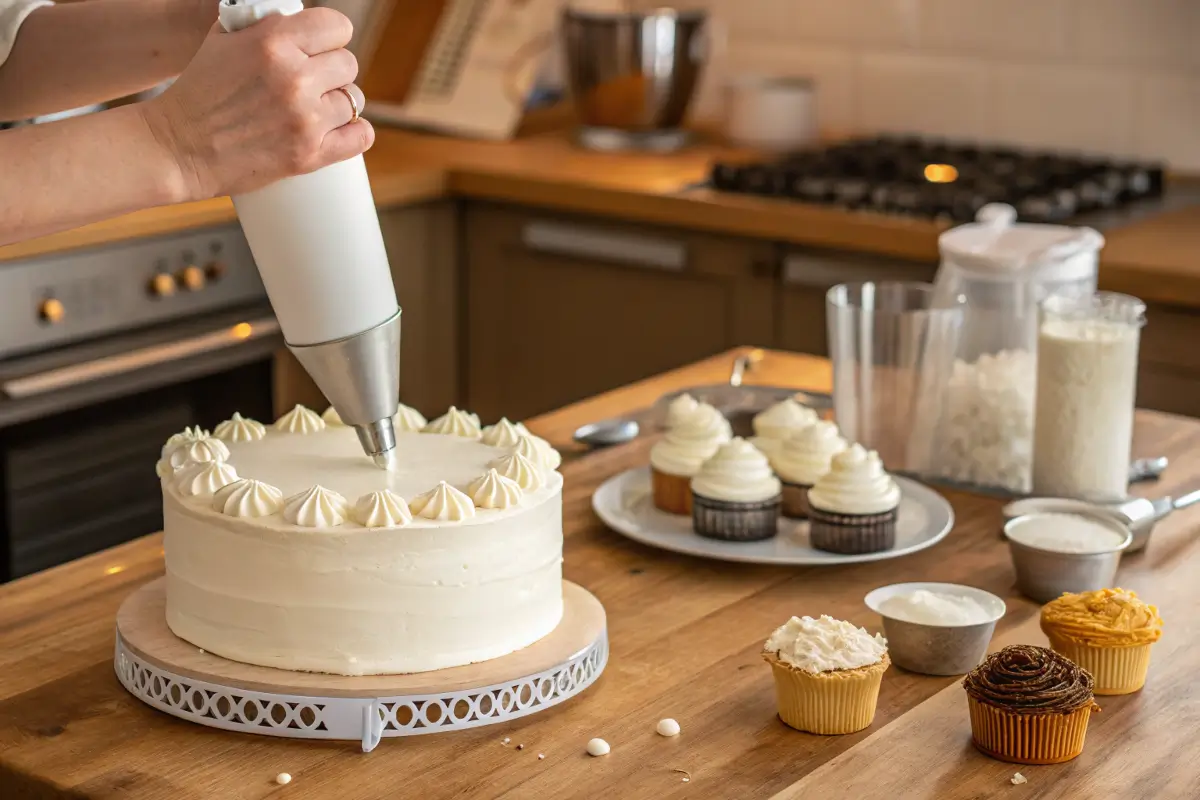
Fit a piping bag with a round or petal tip and fill it with frosting. Start by piping cloud shapes onto the chilled cake. For a more natural effect, vary the sizes and layers of the clouds. Afterward, use an offset spatula or the back of a spoon to smooth the edges or fluff up the frosting.
For beginners, piping can seem intimidating, but don’t worry! Practicing on parchment paper first helps you get the hang of it.
Finishing Touches: Adding Color Gradients or Glitter
To make your cloud cake truly pop, add some finishing touches. Airbrush gentle blue gradients around the clouds or dust edible glitter for a magical sparkle. If you want a whimsical vibe, scatter small edible stars or rainbow sprinkles over the design.
Once completed, your cake will look like a slice of the sky, perfect for any celebration. By following these steps, you’ll master how to make clouds in a cake with ease.
Troubleshooting and Pro Tips
Common Mistakes When Making Cloud Cakes
Even the most experienced bakers face hiccups. Here are some common mistakes to avoid:
- Runny frosting: If your frosting is too soft, it won’t hold the cloud shapes. Chill it for a few minutes to firm it up.
- Overmixed frosting: This can result in a heavy texture, so whip just until soft peaks form.
- Uneven cake layers: Use a serrated knife to level each layer before stacking them.
By recognizing these pitfalls, you’ll save time and frustration while perfecting your design.
How to Fix Frosting That’s Too Runny or Thick
If your frosting is runny, refrigerate it for 10–15 minutes. You can also add powdered sugar to thicken buttercream or a bit of cornstarch to whipped cream. For frosting that’s too thick, mix in a teaspoon of milk or heavy cream until it reaches the desired consistency.
Pro Tips for Achieving a Realistic Cloud Effect
- Vary the heights and shapes of the clouds: This adds dimension to your cake.
- Keep a light touch when airbrushing: Heavy strokes can overwhelm the delicate cloud look.
- Practice patience: Let each layer of frosting or airbrushing dry before adding more details.
FAQs About Making Clouds in a Cake
How Long Does It Take to Decorate a Cloud Cake?
The time needed to decorate a cloud cake depends on the complexity of the design and your skill level. For beginners, creating the base layer and piping clouds may take 2–3 hours, including preparation and resting time. Advanced decorators using techniques like airbrushing or layering multiple colors might need 4–5 hours.
If you’re short on time, consider simplifying the design by using stencils or ready-made frosting to speed up the process.
Can I Use Non-Dairy Ingredients for Clouds?
Absolutely! For a non-dairy option, replace butter with vegan butter and heavy cream with coconut cream. Stabilized whipped coconut cream works wonders for a fluffy texture, making it easy to pipe cloud shapes. Vegan buttercream is another excellent choice for achieving that cloud-like effect.
What Are the Best Food Colors for Realistic Clouds?
Gel food coloring is the top choice for vibrant yet subtle colors. Stick to soft whites, grays, and blues for a realistic cloud design. For an artistic touch, experiment with light pastel hues or a gradient effect using an airbrush.
How Do I Store a Cloud Cake After Decorating?
To keep your cloud cake fresh and intact, store it in an airtight container in the fridge. If using whipped cream frosting, consume the cake within 24–48 hours to maintain the texture. For buttercream designs, it can last up to 3–4 days refrigerated.
Wrapping Up and Final Thoughts
Decorating a cake with dreamy, fluffy clouds is a wonderful way to elevate any occasion. By learning how to make clouds in a cake, you’ll not only improve your cake-decorating skills but also unleash your creative potential. Whether you’re using buttercream, whipped cream, or advanced techniques like airbrushing, there’s no limit to the artistic flair you can bring to your designs.
Remember, the key to success lies in the details—choosing the right ingredients, perfecting the texture of your frosting, and practicing patience throughout the process. Don’t shy away from experimenting with different tools and techniques to make your cloud cake unique.
With these tips and techniques, you’re well on your way to creating a breathtaking cloud cake that will leave everyone in awe. Happy baking!
Creative Variations for Cloud Cakes
Incorporating Colorful Themes into Your Cloud Cake
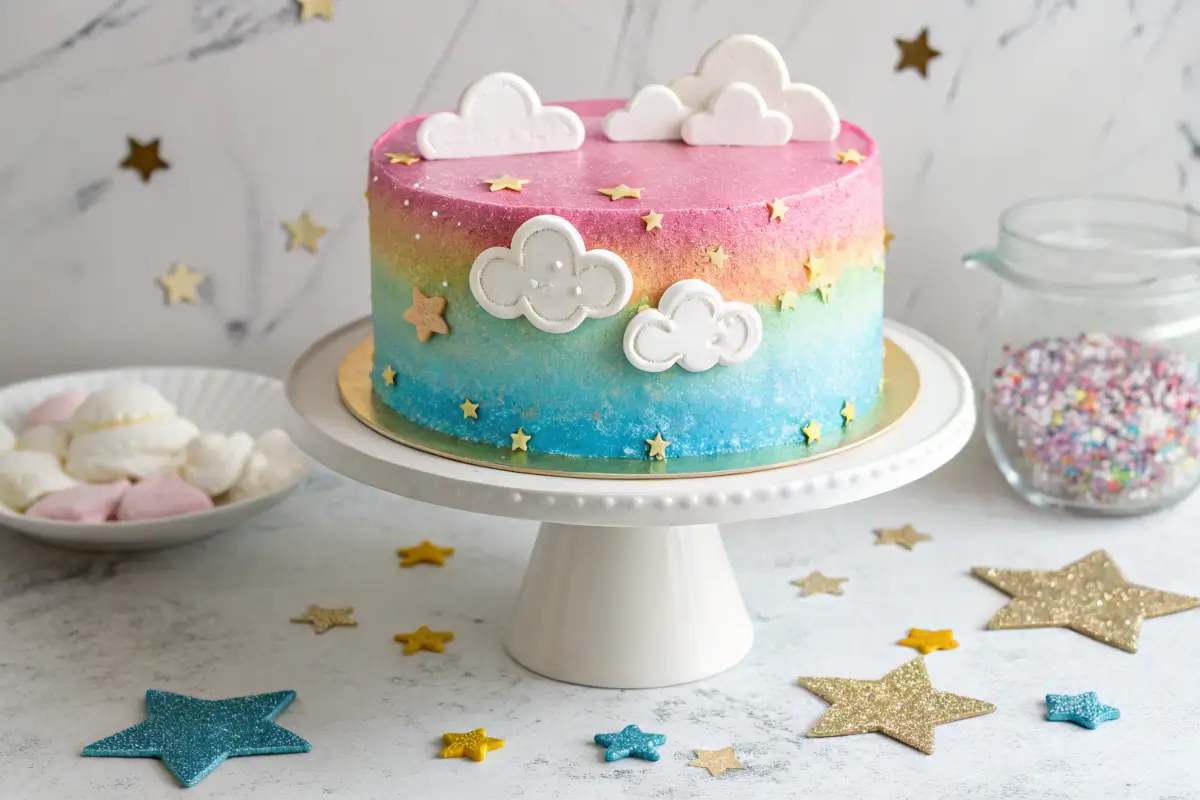
If you’re wondering how to make clouds in a cake that stand out, adding a touch of color can work wonders. Instead of sticking with the classic white clouds, consider blending in soft pastel hues like pink, lavender, or peach for a dreamy sunset effect. To achieve this look, layer different shades of frosting and blend them gently using an offset spatula or airbrush.
For a fun twist, pair the clouds with rainbows or stars. Use edible gold dust or candy sprinkles to add sparkle, creating a magical theme perfect for children’s parties or whimsical celebrations.
Adding 3D Elements for Extra Wow Factor
Take your cloud cake to the next level by adding 3D elements. Use fondant to craft fluffy cloud shapes that can sit atop the cake or cascade down the sides. For an airy, lightweight look, consider using marshmallows as edible clouds. Simply dust them with powdered sugar or edible glitter to match the overall design.
With a little creativity, these variations can turn your cake into a masterpiece that suits any special occasion, from baby showers to weddings.
Why You Should Try Making a Cloud Cake
Learning how to make clouds in a cake is more than just a fun baking project—it’s a creative outlet that allows you to craft something truly unique. Cloud cakes bring a whimsical, elegant touch to any event, making them a hit with guests of all ages. Whether you’re baking for a casual get-together or an elaborate celebration, this technique lets you personalize your cake to match the theme and mood.
Additionally, making a cloud cake provides an excellent opportunity to hone your baking and decorating skills. You’ll learn to master tools like piping bags, airbrush machines, and even fondant sculpting, opening up endless possibilities for future projects.
Finally, there’s no better feeling than seeing the smiles on your guests’ faces when they admire your stunning creation. A cloud cake isn’t just a dessert; it’s a centerpiece, a conversation starter, and a delicious work of art.
So, why not dive into this enchanting world of cake decorating? With the tips and techniques outlined in this guide, you’ll have everything you need to succeed.